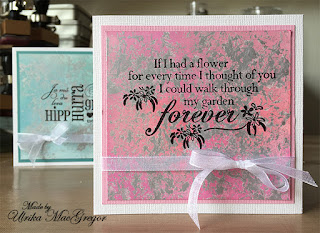
En bakgrund av skimrande pärlemor är enkelt att åstadkomma med bara några enkla verktyg. Lite längre ner i detta inlägg hittar du vad man behöver och hur man gör. Jag har använt mina bakgrunder på kort där jag stämplat med Staz-on för att vara säker på att stämpelmotivet inte smetas ut.
Faux mother of pearl is really easy to accomplish at home, with only a few supplies. Further down in this post you will find a list of supplies and step-by-step instructions. I used my backgrounds for quick-and-easy cards where I stamped the sentiments using Staz-on, to make sure the ink doesn't smear.
Först och främst så behöver du några distressdynor, jag har använt matchande nyanser men det går bra att experimentera och blanda de färger man tycker passar. Själva pärlemoreffekten får man med hjälp av All purpose ink. Man kan blanda olika färger, så länge en av dem har metallic färg. Pappret jag använder är Gloss paper från Ranger. Man behöver en papptallrik eller bullform att ha färgen i, och en liten bit vanlig plastfolie för att dutta ut färgen.
First, you're going to need a couple of Distress ink pads. used matching colours, but it's perfectly fine to experiment and mix as you please. The mother of pearl effect is achieved using All purpose ink. You can blend colours, just make sure at least one of them contains metallic. The paper is a gloss paper from Ranger. You will also need a paper plate or something else to keep the paint on. And finally a piece of cling film.
Häll lite färg i bullformen. Jag har använt platinum och lättat upp den lite med vit.
Start by pouring a small amount of paint on the paper plate. I used platinum, and added a little white to brighten it up.
Skrynkla ihop plastfolien till en liten boll och använd den som "pensel", och dutta ut färgen på det blanka pappret. Täck inte hela pappret, utan låt en del områden vara utan färg.
Scrunch up the cling film and use it to pat the paint onto the glossy paper. Don't cover it completely, but make sure to leave areas "in between" unpainted.
Nu är det dags att sätta lite färg på projektet! Använd en skumgummidyna eller en Blending tool för att gnussa ut färgen över hela pappret. Man kan ta en lätt fuktig trasa och gå över pappret med efteråt så man får bort eventuella färgrester som fastnat över områdena med All purpose ink.
Now it's time to add some colour to the project! Use a sponge or a Blending tool to carefully add the ink using a circular motion. Use the different colours and make sure you cover the whole paper. If needed, go over the paper with damp cloth afterwards, just to remove and residue of the distress ink over the areas covered with the All purpose ink, which acts as a resist.
Använd Staz-on om du ska stämpla på ytan eftersom den är glatt. Annars kan motivet smetas ut.
Use Staz-on if you want to stamp in top of the background. Since the surface is glossy, you need to make sure to use an ink pad that won't let the ink smear.
Hoppas att du provar, det här är verkligen jätteroligt! :)
I hope you'll give this a try, it's really fun! :)
Materials used:
Paper: Gloss paper
Paint: All purpose ink FX-INK-080 All purpose ink White, FX-INK-071 All Purpose Ink Platinum
Ink: Distress ink
Stamps: OM748F, OM751K
Tools: IBT23616 Ink Blending Tool, NSC20677 Non-stick craft sheet
Love, DT-Ulrika


No comments:
Post a Comment